WishList Member includes an integration with 2Checkout. You can set users to be added to a membership level in WishList Member if they purchase through 2Checkout.
More details are explained below (including a Video Tutorial).
—
Enable 2Checkout Integration
First, you can select and enable the 2Checkout option in the Setup > Integrations > Payment Providers section of WishList Member.

—

—
The Settings tab will appear and the API Status will show as “Not Configured”. This is because WishList Member and 2Checkout need to be connected using a few specific pieces of information provided by WishList Member and 2Checkout. This process is explained below.
Connecting WishList Member and 2Checkout
Click the blue Configure button.

—
The 2Checkout Configuration popup will appear and will display the API tab.

—
There are three fields in the API tab that require pieces of information from 2Checkout.
- Merchant Code
- Publishable Key
- Private Key
Note: There is a checkbox named “Enable Sandbox Mode”. If enabled, the Sandbox Mode can be used for testing purchases through 2Checkout without processing actual payments.
Each of the codes/keys are located in the Integrations > Webhooks & API section of 2Checkout.

—
Copy the Merchant Code, Publishable Key and Private Key in 2Checkout and paste them into the corresponding fields in WishList Member in the 2Checkout Configuration popup in the API tab.

—
Note: One more piece of information is needed from 2Checkout to complete the connection with WishList Member. The Secret Key from 2Checkout will need to be pasted into the corresponding field in the Settings tab before clicking the Save button.
Click the Settings tab in the 2Checkout Configuration popup. The Secret Key field appears near the bottom.
Note: There are two additional settings in this section.
Primary Currency. You can select the preferred currency type. This is the currency users will pay during registration
Support Email. You can set the preferred email address for support. This is the email address to receive support requests related to purchases.

—
The Secret Key is also located in the Integrations > Webhooks & API section of 2Checkout.

—
Copy the Secret Key in 2Checkout and paste it into the corresponding field in WishList Member in the 2Checkout Configuration popup in the Settings tab.

—
Click the Save & Close button to create the connection between WishList Member and 2Checkout.
The API Status will now be displayed as “Connected”.

—
There is one piece of information in WishList Member that needs to be entered into 2Checkout.
The Thank You URL / Notification URL in the main Settings section of the 2Checkout integration section in WishList Member.
Copy the Thank You URL / Notification URL from WishList Member.

—
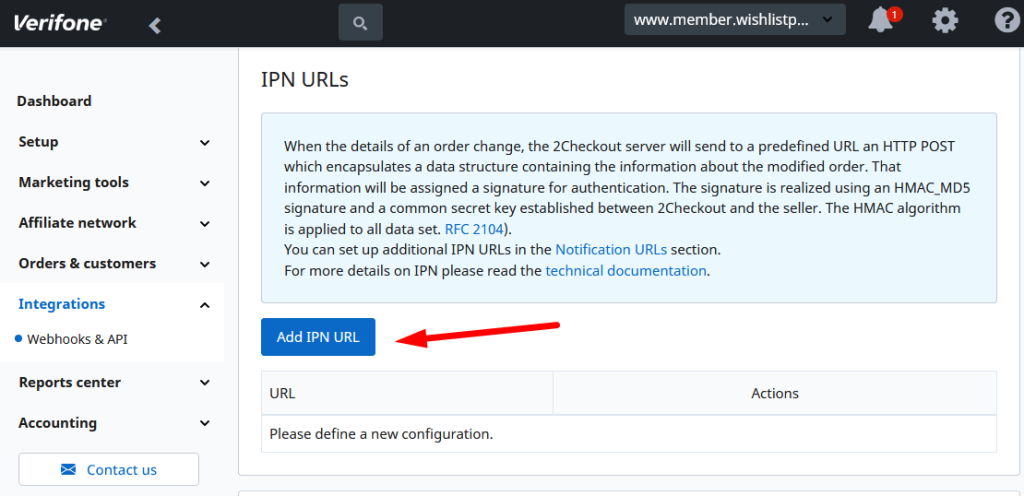
And paste it into the IPN URL field in the Integrations > Webhooks & API > IPN Settings section of 2Checkout.
Note: You will need to click the blue Add IPN URL button and the New URL configuration popup will appear.

—
Paste the Thank You URL / Notification URL from WishList Member into the IPN URL field and click the ADD IPN button.

—
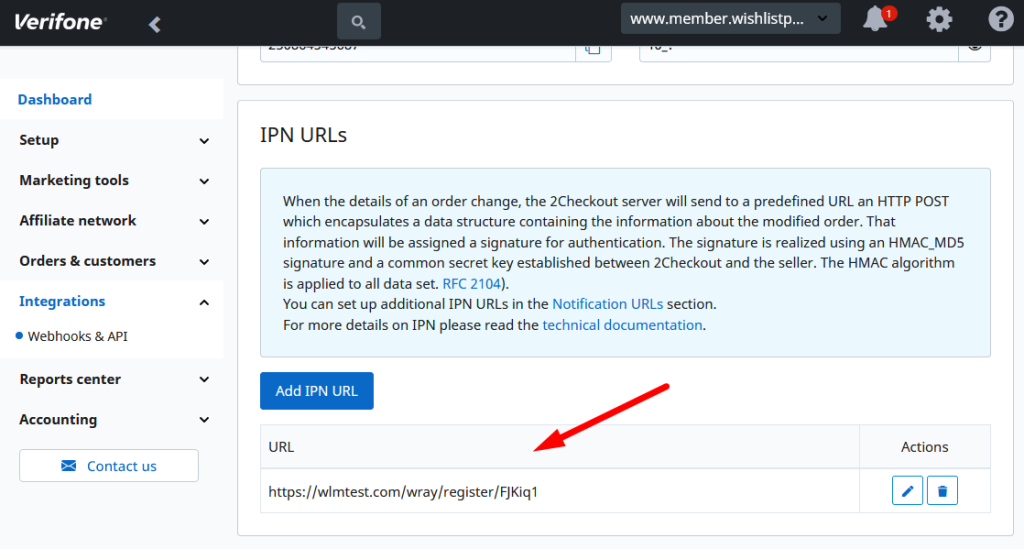
The Thank You URL / Notification URL from WishList Member is now set as a IPN URL.

—
WishList Member and 2Checkout are now fully connected and the integration process can continue.
Payment Form
Click the blue Configure button again and select the Payment Form tab in the 2Checkout Configuration popup.

—

—
A payment form popup will appear when a user clicks to purchase on the live site. The Payment Form tab controls the appearance of that form. The following settings are available for configuration.
Heading. The top of the form will display the text in this field. The default message is: Register for %level. Note: %level will be replaced by the name of the membership level on the live site.
Heading Logo. An image can be shown on the top of the form.
Button Label. The button that is inserted on the page. The popup payment form will appear when a user clicks this button. The default message is: Join %level. Note: %level will be replaced by the name of the membership level on the live site.
Panel Button Label. The button within the popup payment form. A user clicks this button to pay. The default message is: Pay.
Click the Save & Close button when finished.
—
Product Settings
A Products tab appears when WishList Member and 2Checkout are fully connected. You can now configure product settings for the desired membership levels and/or pay per posts.

—
Click a membership level or pay per post to edit.
The Editing 2Checkout Product for Level Name popup will appear.

—
The following settings are available for configuration.
Amount. The price set to purchase access to the level. Note: The currency type will be based on the Primary Currency set in the Configure > Settings section.
Recurring. If enabled, a recurring payment can be set.
Recurring Amount. The recurring payment amount that will be charged after the initial payment amount.
Interval. The set period of time between recurring payments.
Click the Save & Close button when finished.
—
The two screenshot examples below show the Gold level configured to cost $20 for the initial payment with a recurring payment of $10 set to be charged every month.

—

—
Selling your Product (with Connected Membership Level)
The last step is adding the purchase button to your site.
A shortcode is automatically generated for each configured membership level. This means you can insert a purchase button onto any page or post on your site.
This can be done by using the WishList Member Shortcode Inserter.
The WishList Member Shortcode Inserter can be accessed using a Classic Block through the Gutenberg editor or by using the Shortcode Creator located on the WishList Member Dashboard.
In the example below, we will use the Classic Block in the Gutenberg editor to insert the purchase button for the Gold level..
Insert the Classic Block and click on the blue WishList Member Shortcode Inserter button
Select Integrations > 2Checkout API Integration > Gold Registration Button.

—
The shortcode will appear in the edit page section.

—
You can add any additional text or design elements to your sales page. The example below shows only the shortcode inserted and displaying the Join button on the live site. Clicking the button will display the payment form popup.

—
Below is a screenshot example of the payment form popup that appears when the Join button is clicked.

—
The user can fill in the form and make the payment. This will result in the user being granted access to the Gold level.
—
