Do you want to adjust the registration settings for a specific membership level? That is where the WishList Member Registration Settings come in.
There are general registration settings that apply to all membership levels and those can be set on a Global Default basis in WishList Member. But what if you want to adjust the registration settings differently for one membership level. That option is available to you within WishList Member as well.
—
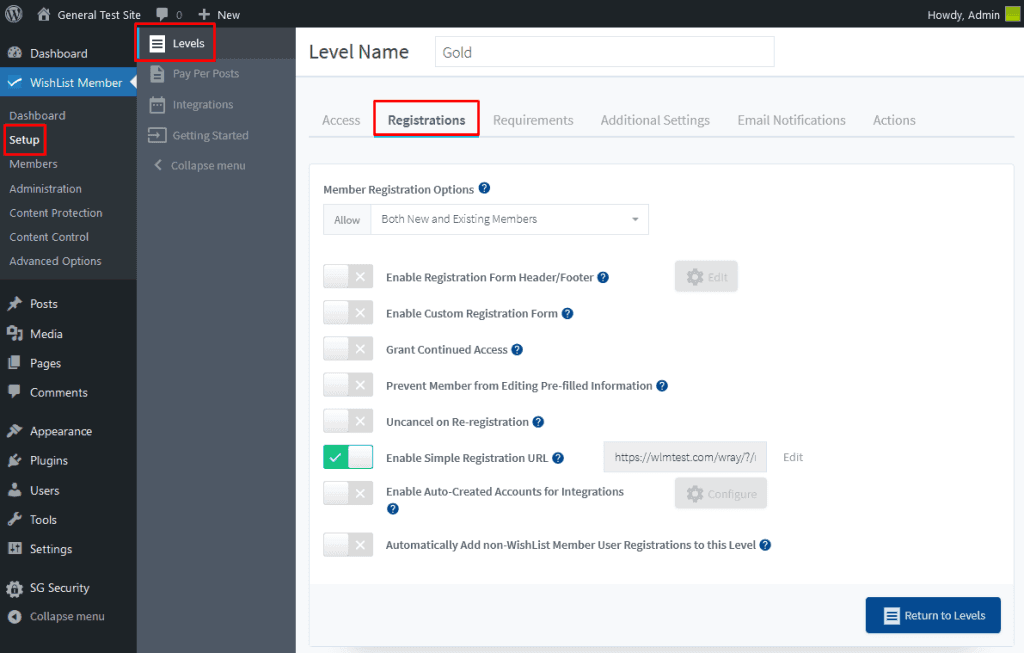
When creating or editing a membership level, you can set the registration settings for that specific membership level in the Setup > Levels > *Click to Edit a Level* > Registrations tab.

—
The Registrations tab includes several options that can be adjusted for a membership level.
Member Registration Options
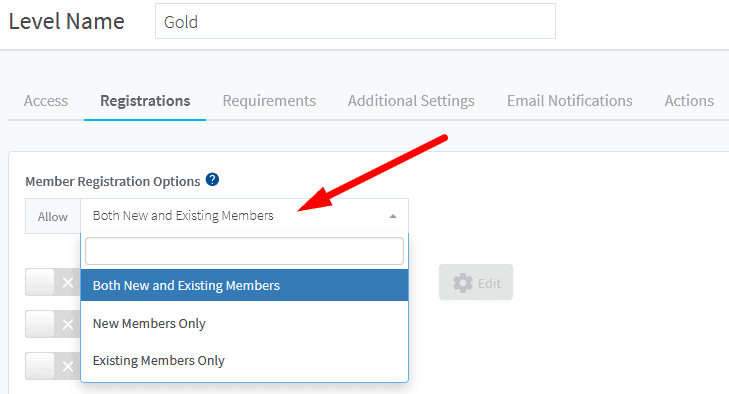
There are three membership registration options. These control how the registration form appears to users.
- Brand New and Existing Members
- New Members Only
- Existing Members Only

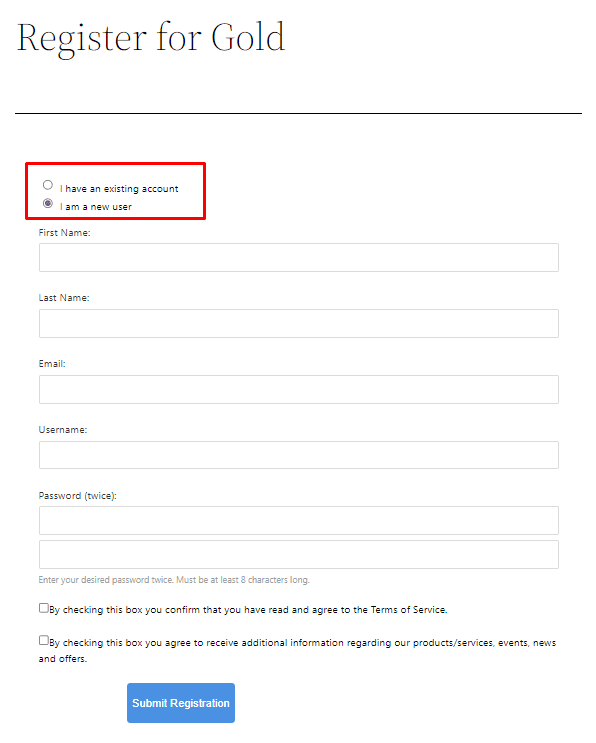
Both New and Existing Members. This is the default option and will fit most needs. The registration form will include two options. It will display the fields for a new member and for an existing member on separate tabs. This means both new members and existing members can register for the membership level.
If you have multiple memberships available, it's possible a member may end up registering for more than one level. For example, they may initially register for your Bronze level and later decide to upgrade to your Gold level.
In this scenario, you won't want them creating a whole new member account. You can let them simply upgrade their existing member account. This is what the Allow Both New and Existing Users option handles. It includes an option on your registration form to let new members register and also allow existing users to login to complete the registration instead of creating a new account.
The screenshot example below shows a registration form for a level with the Both New and Existing Members option set. The user can select if they are an existing user or not.

—
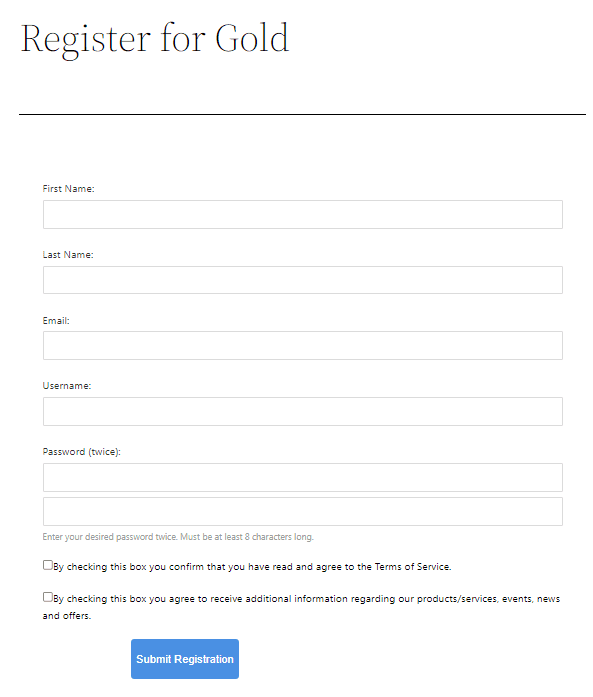
New Members Only. The registration form will only display the fields for a new member. This means existing members would not be able to use the Existing Members option to register for an additional membership level. Only new members can register for the level.
So in some cases, the Existing Members login option may not be necessary. For example, you could select the New Members Only option if you only have one membership level. That would mean the Existing Members login option wouldn't be shown since it wasn't needed.
The screenshot example below shows a registration form for a level with the New Members Only option set. Only the registration form appears and only new members can register.

—
Existing Members Only. The registration form will only display the fields for an existing member. This means existing members need to login using the Existing Members option when registering for an additional membership level. New members cannot register using this registration form.
You may decide that a certain level may only be available to existing members. In this scenario, you could select the Existing Members Only option. That would mean only existing members could register for the membership level.
The screenshot example below shows a registration form for a level with the Existing Members Only option set. Only the login form appears and only existing members can login to complete the registration.

—
Enable Registration Form Header / Footer
The member registration page generated by WishList Member includes header and footer sections. This is a unique option available in the WishList Member Registration Settings.
If enabled, an Edit button will appear. This allows you to customize the Header section displayed above a registration form and/or the Footer section displayed below a registration form if you want.

—
By default, the Header and Footer sections are empty. You can enable this option and could then add your own text or HTML code to these sections if you wanted.
If you click the Edit button the Header/Footer popup appears and you will see a Header and Footer tab. You can add your text or HTML code to the appropriate section and click Save or Save & Close.

[ht_message mstyle=”info” title=”Additional Information” ” show_icon=”true” id=”” class=”” style=”” ]The ability to insert HTML code includes JavaScript code. So, for example, if you are using an affiliate program that requires you insert JavaScript code on an “after payment” page, you can place that here.[/ht_message]
Enable Custom Registration Form
You can create Custom Registration Forms in the Advanced Options > Registrations > Custom Forms section of WishList Member.
If you have created a custom registration form, you can choose to apply it to a particular membership level. You can do this by enabling the option and selecting the form you would like to use from the dropdown box that will appear.

—
More details can be found in the Custom Registration Form – Apply to Level article.
Grant Continued Access
If enabled, this option allows a member to retain access to content they have been given access to during their membership even after their membership level has been cancelled or expired. They continue to be able to access content within the membership level.

—
Should members retain access to the content they have already been provided after they cancel their membership? For example, let's say a member joins your membership in March and remains a member until June. At this point they decide to cancel their membership.
Do you want that member to retain access to all the content you released between March and June? Or, should their access to all content be immediately revoked upon cancellation? Enable the Grant Continued Access option if you want them to retain access. Disable the Grant Continued Access option if you want their access immediately revoked.
—
Prevent user from editing pre-filled information
If enabled, this option will prevent the user from editing any information that was pre-filled in the registration form that appears after payment. When a membership level is integrated with a payment provider, many of the payment providers will pass the first name, last name and email address that was entered during payment back to the registration form. These fields will be pre-filled and unable to be edited. An integration with a payment provider can be setup in the Setup > Integrations > Payment Providers section of WishList Member.
If disabled, users will be able to edit any pre-filled information.
In most cases, we recommend leaving this option disabled. Member contact information stored in a payment provider can be outdated or not the ideal contact information. Not letting them edit that contact information can lead to out of date records in your system.

—
Uncancel on Re-registration
This option only applies to membership levels that allow free registration or simple integration. If enabled, this option will allow a user with a cancelled level status to register for the level again and remove their cancelled status. They will be given active status for the level.
If this option is disabled, the user will see a message stating they are already registered to this level if they try to register again. This only affects a simple / free registration form. If the level is integrated with a payment provider, this setting is unneeded and will have no effect.
The user will automatically be uncancelled upon a successful payment/registration and will be given active status for the level. An integration with a payment provider can be setup in the Setup > Integrations > Payment Providers section of WishList Member.

—
Enable Simple Registration URL (Allow Test or Free Registration)
If enabled, a field containing a registration URL will appear. The registration URL can be used to allow for free registration to the level. The registration URL can also be used to test the registration process. Copying the registration URL and pasting it into a browser will display a page with a registration form for the level.
Levels integrated with a payment provider in the Setup > Integrations > Payment Providers section of WishList Member will not use this registration URL.
Do you want to allow members to register for this level for free? If so, you can enable this option. Once enabled, you will see the Registration URL you can copy and paste. This will allow for free registration.
Or you can use it to test the registration process. You can temporarily enable this option and test the Registration. Once you're finished, you can disable the option to prevent free registrations.
This option appears near the bottom of the WishList Member Registration Settings section.

—
Note: You can click the Edit button to edit the end of the URL if you ever want to change it. This can be useful if you have previously given out the Registration URL and decide you no longer want the level to be made available for free.

—
Enable Auto-Created Accounts for Integrations
If enabled, a Configure button will appear. This option can be used to automatically create an account for a user after successful payment if the level is integrated with a payment provider. By default, payment providers will create an incomplete registration in the Members > Manage Members section of WishList Member until the user completes the registration process. This option can be configured to create an account for the user immediately or after a set delay.

—
Automatically Add non-WishList Member User Registrations to this Level
If enabled, this option will automatically add a user to the membership level if they join through a non-WishList Member registration option on the site. For example, registrations through the WordPress registration form or a 3rd party registration form on the WordPress site. Registration needs to happen on the WordPress site in order to add the user to the membership level.

—
More information on Registration is available in the Registrations – Overview article.
You can use the WishList Member Registration Settings as described in the article above to customize the experience for your members.
—
Note: You can get more info on each tab that appears when creating or editing a membership level using the links below.
- Create a New Membership Level – Overview (includes a Video Tutorial)
- Access
- Registrations
- Requirements
- Additional Settings
- Email Notifications
- Actions
