
There may be times when you want to allow users to register but you want to restrict access until you've approved them. Using the WishList Member registration requirements settings can definitely help.
This method is useful if you have specific content you only want accessible by a select list of people. Perhaps you have a page of instructions only meant to be seen by your students or you need to be sure a sensitive piece of content is only viewed by a specific group of users.
WishList Member gives you the power to choose to approve (or not approve) anyone who registers.
Or, you may want the users to confirm their registration through email before they can access the protected content. This can help to reduce spam registrations since the user must click a link sent through email in order to view protected content.
You can even require they agree to your terms of service or fill in a reCaptcha before they can complete their registration.
The choice is yours when using WishList Member and the Registration Requirements settings.
—
Requirement Settings
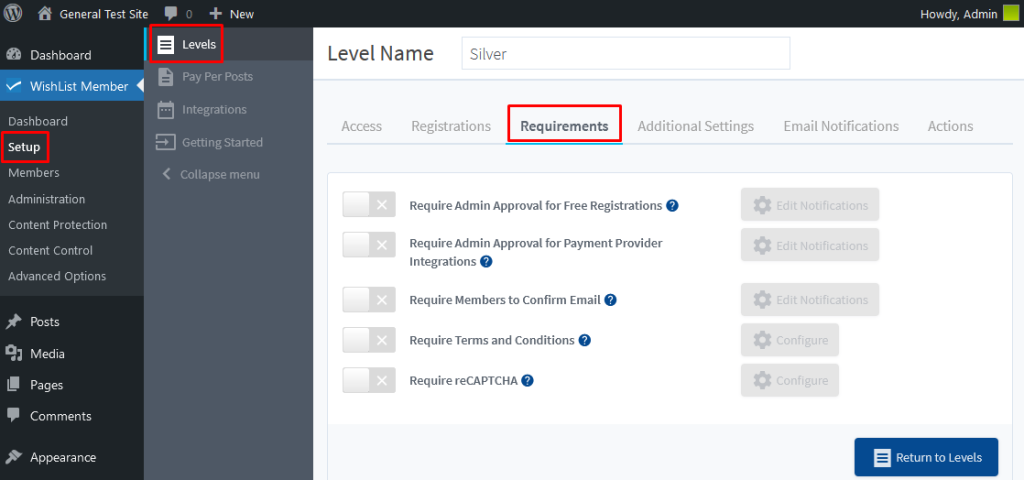
The WishList Member registration requirements settings are available in the Setup > Levels > Click to edit Level > Requirements section in WishList Member. The screenshot example below shows a level named Silver.
—
The Requirements tab has several options. More details on each is available below.

—
Require Admin Approval For Free Registrations
If enabled, the site admin must confirm the free registration before the user is given the Active status to the level.

—
The user will have the Needs Approval status for the level and cannot access protected content assigned to the level until they are approved. A site admin can approve the registration for a user in the Members > Manage section.
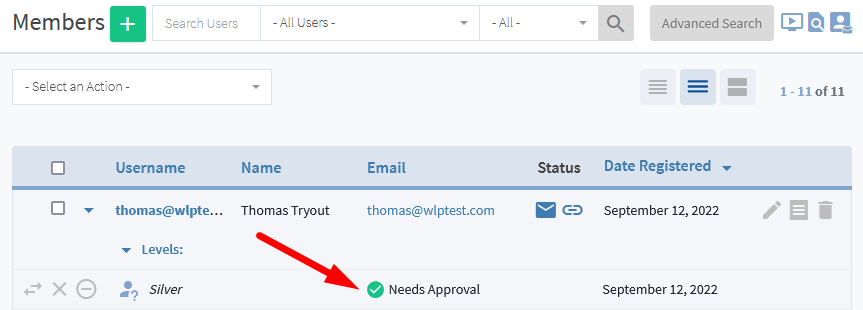
The screenshot example below shows a user who registered for the Silver level. The user has the Needs Approval status for the level since the Silver level requires admin approval.
The user can login to the site but they cannot access any of the content assigned to the Silver level yet.

—
A site admin can click the Needs Approval icon to approve the registration for the user.
—
The Approve Registration popup will appear and the registration can be confirmed.

—
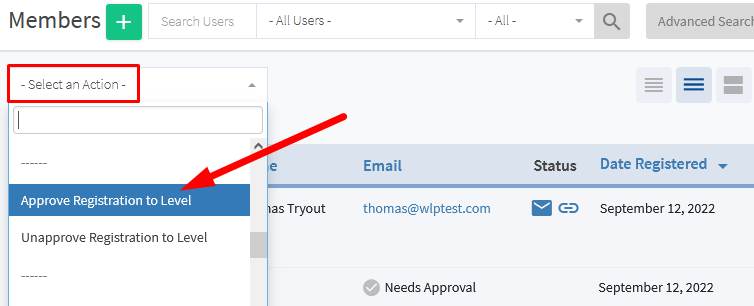
There is also an option in the Action dropdown to “Approve Registration to Level”. This can be used to approve multiple users by clicking the checkbox beside their name(s) and then using the Action dropdown to apply the action to all selected users.

—
—
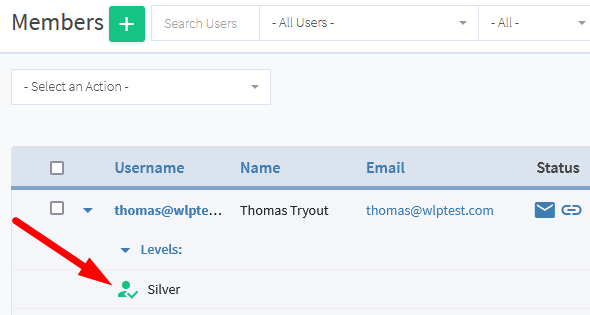
Either method can be used to approve the registration. The user now has the active status for the level and can access any protected content assigned to the level when logged into the site.
—
Note: This setting only applies to free registrations. It does not apply to registrations through an integrated payment provider. Payment providers can be integrated with a level in the Setup > Integrations > Payment Providers section in WishList Member.
Requiring admin approval for free registrations can be useful in team sites for employees or memberships that need each new member to be manually verified.
Require Admin Approval For Free Registrations – Edit Notifications
You can click the Edit Notifications button to view or edit the email notifications that are sent out.

—
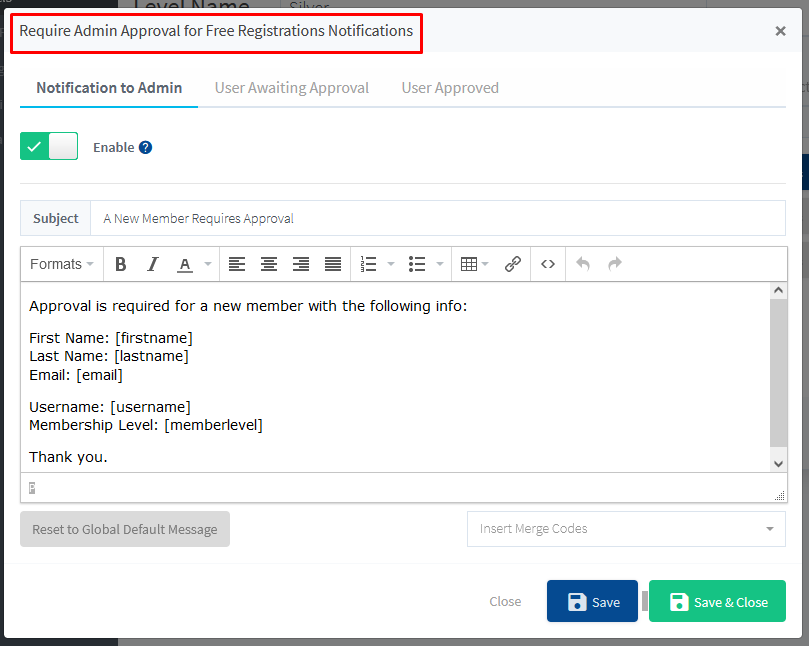
The Require Admin Approval for Free Registrations Notifications popup appears.
—
There are three Notification emails that can be sent. Each can be enabled or disabled in it's own tab depending on your preference.
- Notification to Admin
- User Awaiting Approval
- User Approved
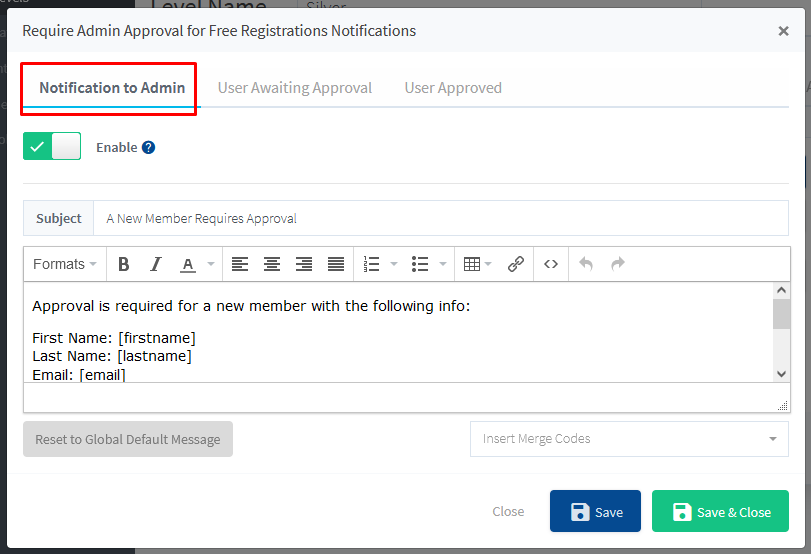
Notification to Admin. If enabled, the notification email will be sent to the site admin if a user registers for the level and requires approval. The site admin can then decide if they want to approve the registration.
The email subject and email message can be edited or the default subject and message can be used. You could set the email subject to something unique that you would recognize right away so you can check on the new registration.
—
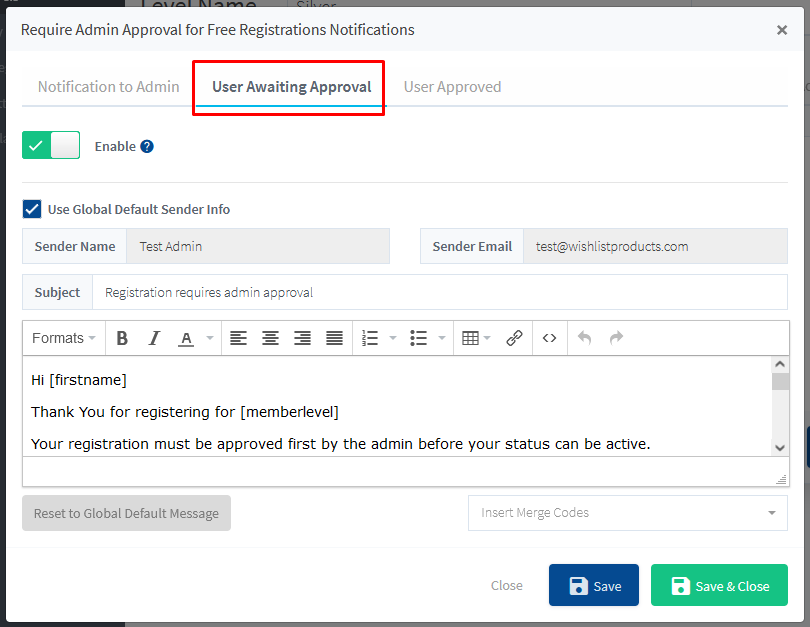
User Awaiting Approval. If enabled, the notification email will be sent to the user if they register for this level and require approval from the site admin. This informs the user their registration has gone through and they can await the potential approval.
The email subject and email message can be edited or the default subject and message can be used.
—
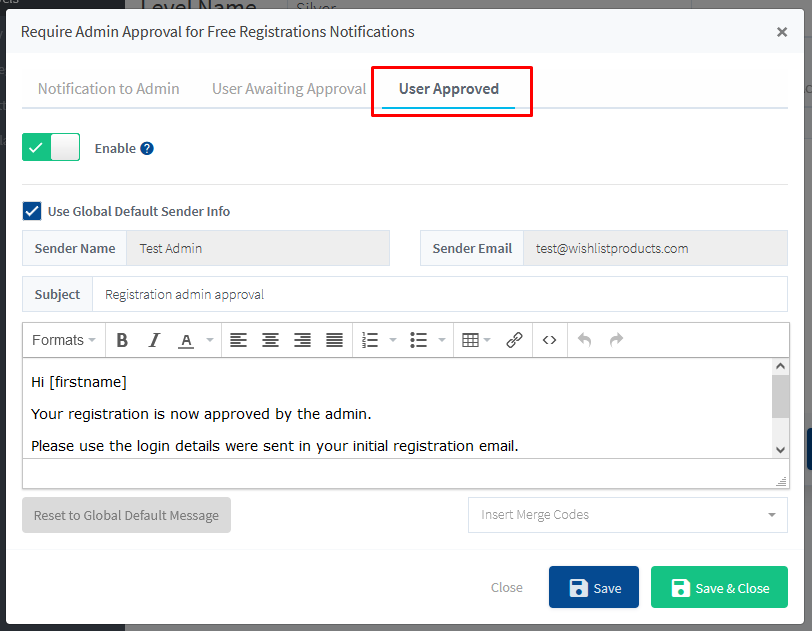
User Approved. If enabled, the notification email will be sent to the user when their registration has been approved by the site admin. This lets the user know they have been approved and can now access protected content.
The email subject and email message can be edited or the default subject and message can be used.
Require Admin Approval For Payment Provider Integrations
This option is nearly identical to the Require Admin Approval For Free Registrations option noted above except this applies to members who first pay through a payment provider. You can select whether or not to require admin approval for these registrations as well. All the same options are available including the email notifications.
The WishList Member registration requirements settings are available for both free and paid registrations.

—
Require Members to Confirm Email
If enabled, the user must confirm the registration by clicking the link in the email that is sent after registration.

—
Once confirmed, the user is given the Active status to the membership level. The user will have the Unconfirmed status for the level and cannot access protected content assigned to the level until they confirm.
The screenshot example below shows a user who registered for the Silver level. The user has the Unconfirmed status for the level since the Silver level requires the user to confirm through email.

—
Note: A site admin has the ability to manually confirm the registration for the user if desired. This could be done if the user is having an issue receiving the email to confirm or if the site admin simply wants to approve the user for any reason.
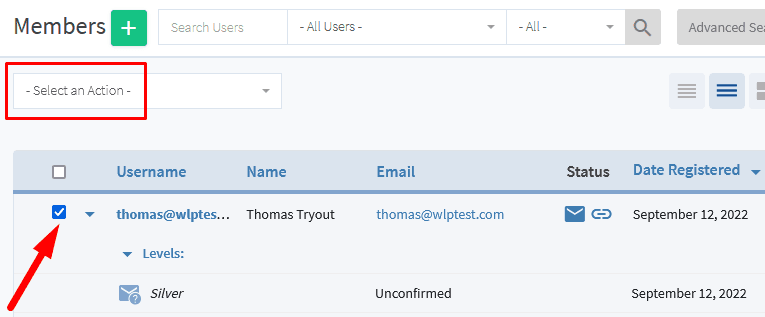
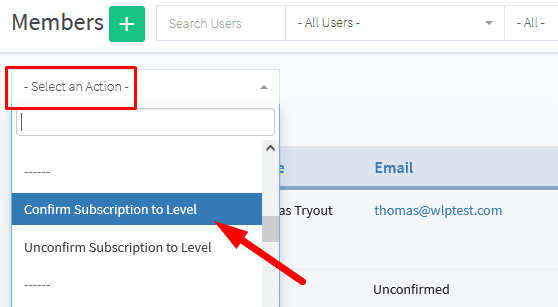
There is also an option in the Action dropdown to “Confirm Subscription to Level”. This can be used to approve one or multiple users by clicking the checkbox beside their name(s) and then using the Action dropdown to apply the action to all selected users.
—
—
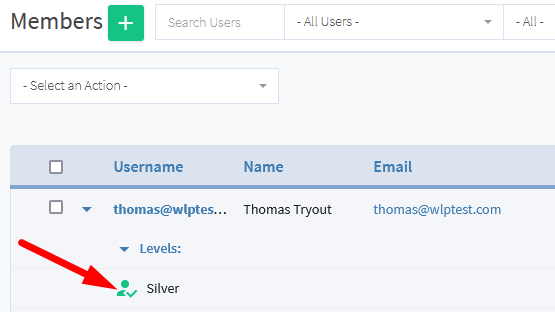
The user now has the active status for the level and can access any protected content assigned to the level when logged into the site.
—
Require Members to Confirm Email – Edit Notifications
You can click the Edit Notifications button to view or edit the email notifications that are sent out.

—
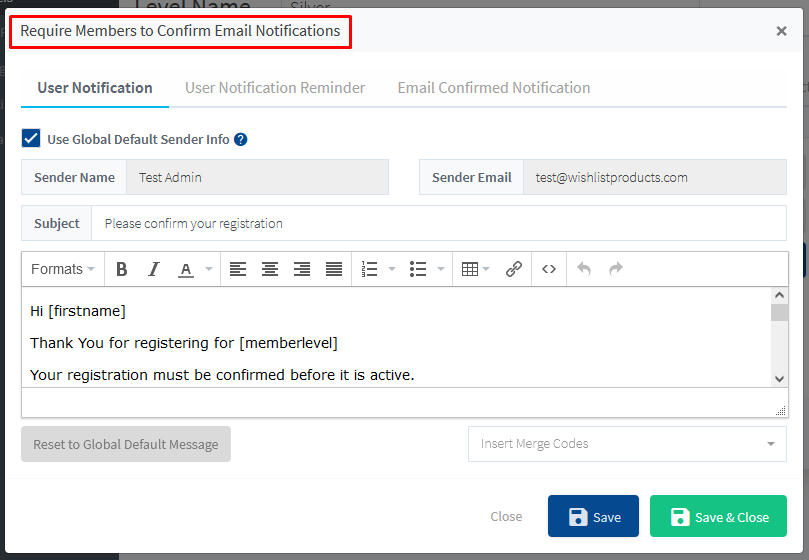
The Require Members to Confirm Email Notifications popup appears.
—
There are three Notification emails that can be sent. Each can be enabled or disabled in it’s own tab depending on your preference.
- User Notification
- User Notification Reminder
- User Confirmed Notification
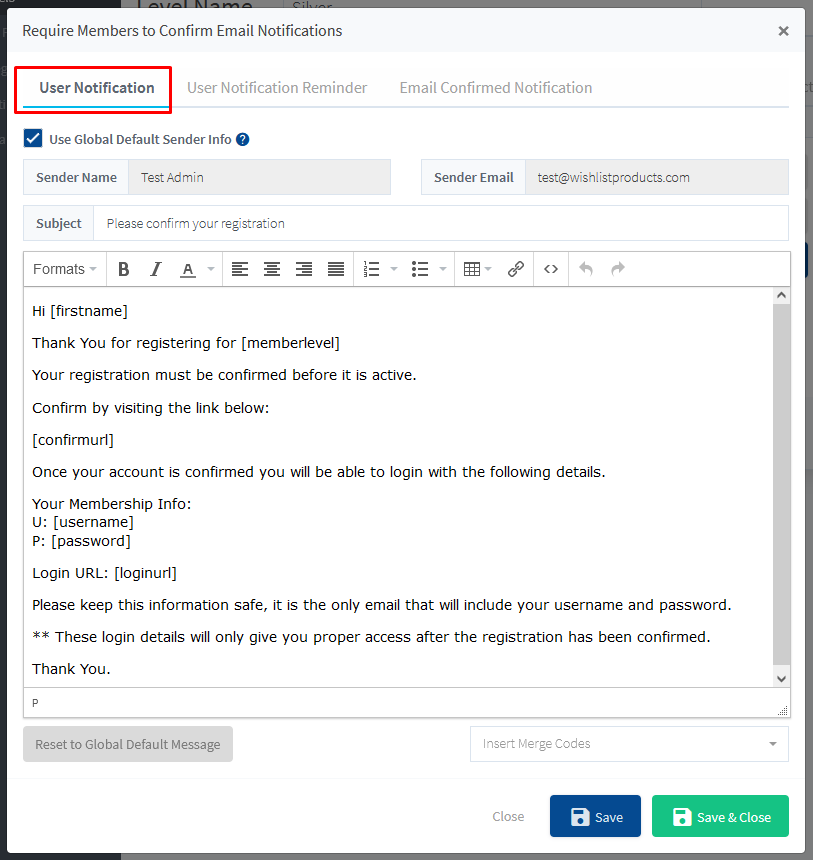
User Notification. The notification email will be sent to the user stating they need to confirm their registration before it is active. The email include the [confirmurl] shortcode which displays a link in the email. Once the user clicks that link, the registration is confirmed and they have active status for the level.
The email subject and email message can be edited or the default subject and message can be used.
—
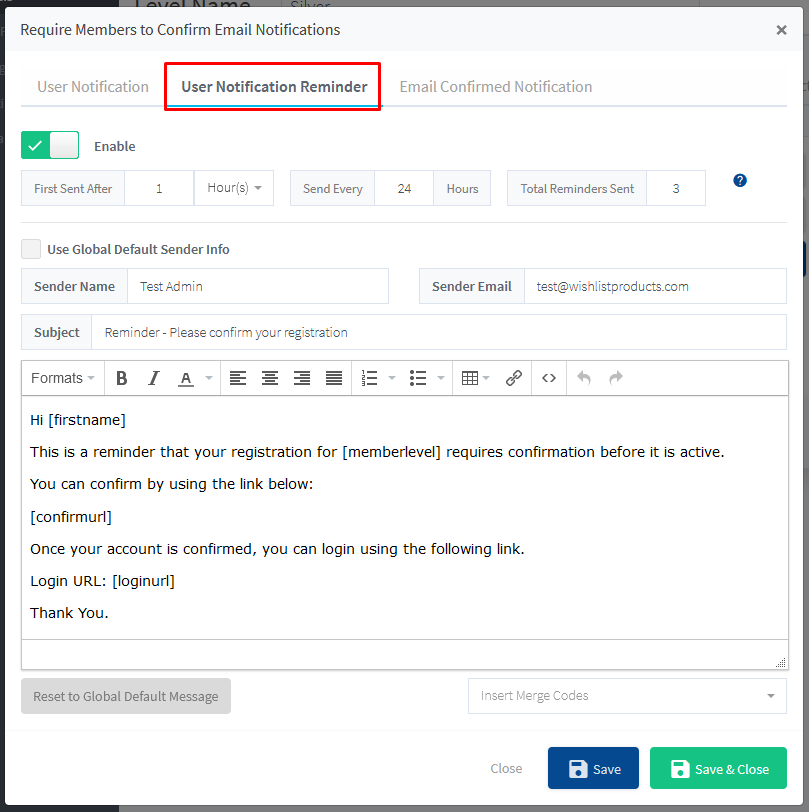
User Notification Reminders. If enabled, a series of reminder emails will be sent to the user if they have not yet confirmed their registration. Reminder emails will not be sent if the user has confirmed their registration. Once a user confirms, these emails are not needed.
There are three fields to handle the reminder emails. The default settings are typically used but you can edit them as needed. Details and a screenshot are included below for reference.

—
First Send After: The first reminder email will be sent after the set time in the First Sent After field. As an example, if this is set to 1 hour, the reminder email would be sent 1 hour after the user registered (if they have not yet confirmed registration).
Send Every: This is the time interval each additional reminder email will be sent after the first reminder email is sent. As an example, if this is set to 24 hours, the next email(s) would be sent in 24 hour intervals after the first reminder email was sent.
Total Reminders Sent: This is the total number of reminder emails to be sent. As an example, if this is set to 3, a total number of 3 reminder emails would be sent at the scheduled intervals. The first reminder email would be sent followed by two additional reminder emails for a total of 3.
The email subject and email message can be edited or the default subject and message can be used.
Note: The email messages are scheduled with the WP Cron built into WordPress. The WP Cron does not support specific time. For example, 1 hour may be slightly more or slightly less than 60 minutes. Decimals can be used to set a time less than 1 hour. Example: 0.5 equals 30 minutes and 0.25 equals 15 minutes.
—
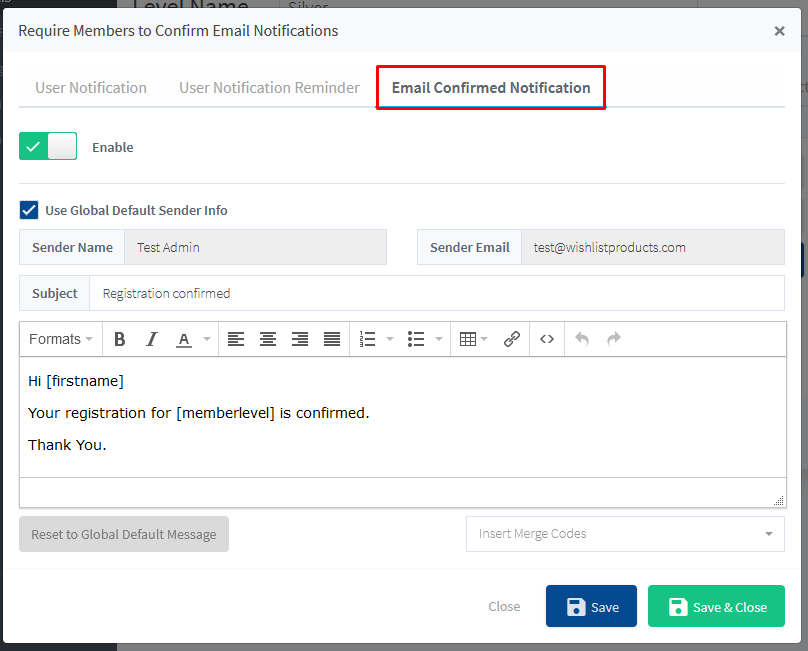
Email Confirmed Notification. If enabled, the notification email will be sent to the user after they have confirmed their registration.
The email subject and email message can be edited or the default subject and message can be used.
—
Email Notification Mergecodes
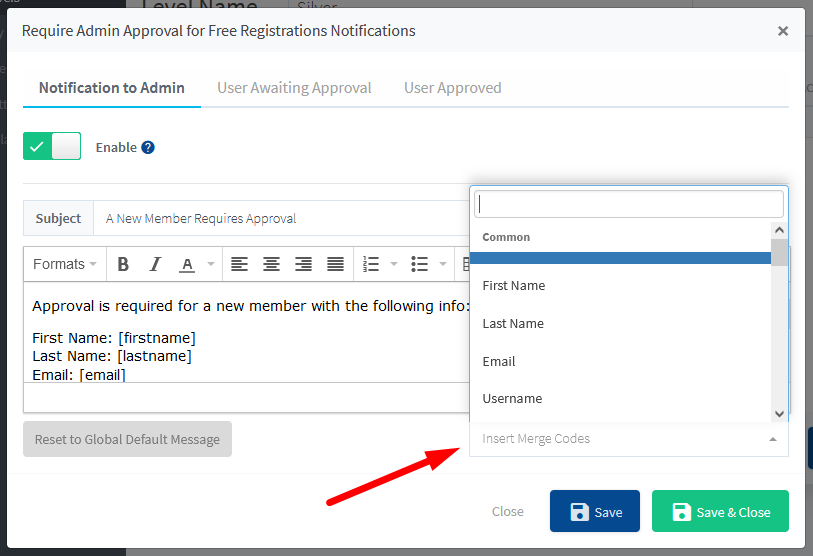
WishList Member mergecodes can be inserted into any of the the email notification messages. The mergecode will be inserted into the message and will display the corresponding information to the user when viewing the email.
For example, the user’s first name, last name, email address, membership level, etc. can be inserted. Simply select the mergecode you would like to include in the email message and WishList Member will automatically input the corresponding information.
—
Require Terms and Conditions
If enabled, the user will be required to click a checkbox acknowledging they accept the terms and conditions before registering for the membership level.

—
Require Terms and Conditions – Configure
You can click the Configure button to view or edit the terms and conditions message.

—
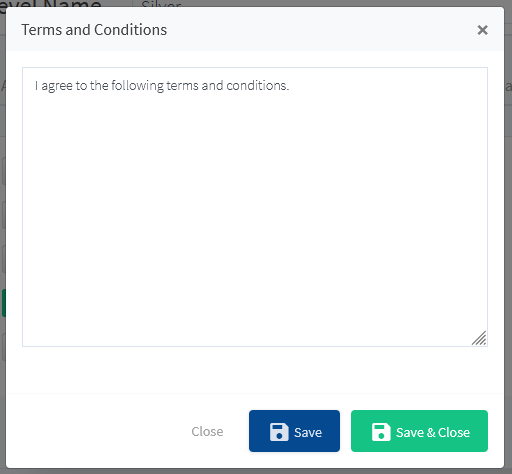
The Terms and Conditions Configure popup appears. You can add your own message using the text box provided.
—
Require reCAPTCHA
If enabled, a reCAPTCHA will be displayed on the registration form that must be confirmed in order to register. This can help reduce spam registrations.

—
Require reCAPTCHA – Configure
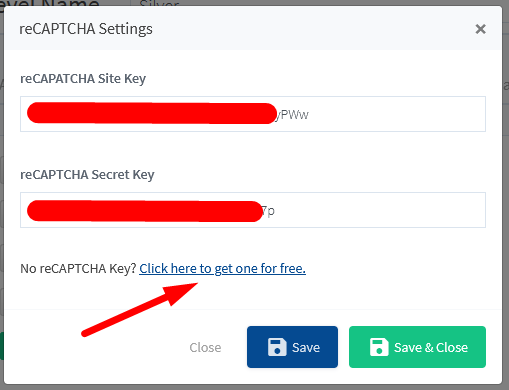
You can click the Configure button to view or edit the reCAPTCHA message.

—
You can enter your reCPATCHA Site Key and Secret Key in the corresponding fields if you already have a reCAPTCHA account. If not, you can use the link provided to create one and get your keys.
—
Additional details on reCAPTCHA Keys:
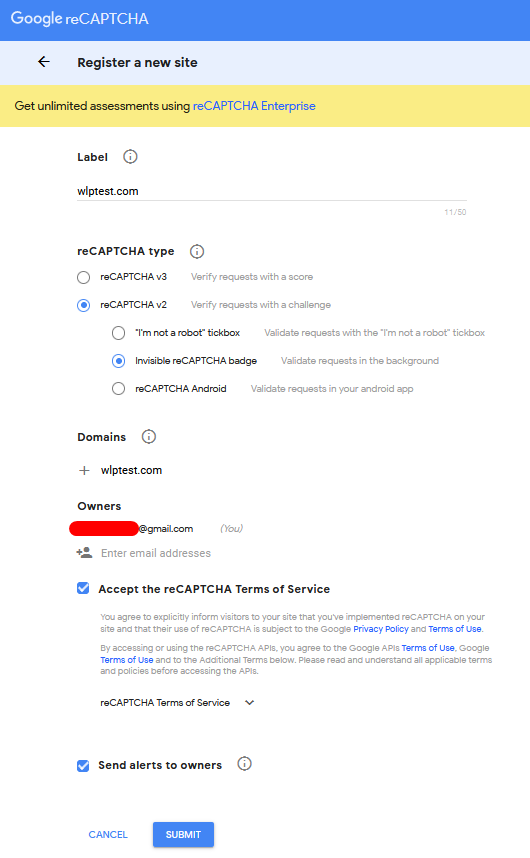
If you have not created a reCAPTCHA account, you can enter a label and select which version of reCAPTCHA you would like to use (V2 is recommended) in the “Register a new site” section. You can select the type of reCAPTCHA you prefer.
A sub-section named “Domains” will appear. You can enter the domain of your membership site into this field and check the box to accept the reCAPTCHA terms of service.
—
Once you click the “Submit” button, you will be taken to a screen that displays your Site Key and Secret Key.
You can now enter the Site Key and Secret Key into the corresponding fields in WishList Member.
—
The WishList Member registration requirements settings are available any time you want to apply any of the options mentioned in this article.
—
Note: You can get more info on each tab that appears when creating or editing a membership level using the links below.
- Create a New Membership Level – Overview (includes a Video Tutorial)
- Access
- Registrations
- Requirements
- Additional Settings
- Email Notifications
- Actions
